Pages

Thursday, May 17, 2012

Easiest card ever

Here is my Weekly SP and Company Stamps design team post. I forgot to include the pic earlier, bit it's here now.

Have you been bitten by the washi tape bug yet?
This stuff is just so darn cute and found everywhere now.
I have several rolls and am looking for new ways to use it all up!
I made a similar card the other day and have gotten so much feedback I decided to do another.

Here are the instructions:
1. Apply strips of washi tape in several coordinating colors.
2. Stamp on top.
That's it!!
The tape is so vibrant that you need a bold stamp to compete with it. The bigger and bolder the stamp is the better it looks. This Many Thanks set from SP and Company's Even Bolder Sentiments line works wonderfully for this!
Thanks for stopping by! For more inspiration using SP and Company stamps head over to their blog for daily ideas.


The colors for this card were inspired by the Runway Inspired Challenge current challenge. It's a really fun blog, go check it out!


Supplies:
Yellow and purple tapes: Up & Up
Pink and grey tape: Studio G
Ink: StazOn Jet Black
Cardstock: SU Crumb Cake

Growing in Unity, Day 4

Welcome to day 4 of Growing in Unity!

Remember to leave a comment every day this week for a chance to win your choice of two Itty Bitty stamp sets from Unity!

Today I've got a little teacher's gift.
 I made some 3x3 note cards to give the teacher so she could use them throughout the year for Thank You's and other occasions. I found these notecard holders and thought they would be perfect to decorate as note holders and she could keep it out on her desk as well.

I started by Mod Podging on some MME Darling Dear papers all the way around and on top.
I added a bit of ribbon around the bottom.


On the top I outlined the paper with some washi tape and added her name with stickers.

On the front I stamped a flower from the Best Wishes and Blooms stamp set and fussy cut them, then Mod Podged on as well. I stamped the frame and sentiment from the Just a Note Itty Bitty set and did the same.


Maybe I can even find a cute little pen tot hrow in there so that she has everything she needs in one spot.


Nw I just need to make 3 more of these by this afternoon! Wish me luck!


Thanks for looking and leave a comment for your chance to win!


Supplies:

MME Six by Six Darling Dear papers
Unity stamps: Just a Note, Best Wishes and Blooms
American Crafts Ribbon
SU Basic Black ink
Mod Podge Matte finish
Rockabye foam letter hickers in Powder

Tuesday, May 15, 2012

Growing in Unity, Day 3

Welcome to day 3 of Growing in Unity!
Every day this week I will be posting a project I made using Unity stamps. Visit my blog every day and comment for your chance to win two Itty Bitty stamps of your choice!


For today's card I made a window card. At least I think that's what it might be called!

I die cut a label shape from the front of the card and added a blue label frame. I adhered purple cardstock to the inside and added the label that was cut from the front.


My stamps are from Unity's April 2012 Kit of the Month set, {Follow your own}.
 After stamping in StazOn black ink, I colored the image with pastels for a soft look. I love the look of this but recommend spraying with a clear coat finish so that the pastels don't smudge.

I just topped it off with a little ribbon.

But then...
I realized there was no room to write on the inside now.
I'm not sure how I'll remedy that. : )
hee hee
Oh, well.


The colors for this card came from the current challenge over at Runway Inspired Challenge which uses this as inspiration:


Thanks for stopping by and don't forget to comment for your chance to win free stamps!


Supplies:
Unity April 2012 KOM stamps
Sizzix Labels Framelits
StazOn Jet Black Ink
SU stampin' pastels
Offray ribbon
Krylon Clear Matte Finish

Growing in Unity, Day 2

Welcome to day 2 of Growing in Unity!
Every day this week I will be posting a project I made using Unity stamps. Visit my blog every day and comment for your chance to win two Itty Bitty stamps of your choice!

Today, I made another very simple card:

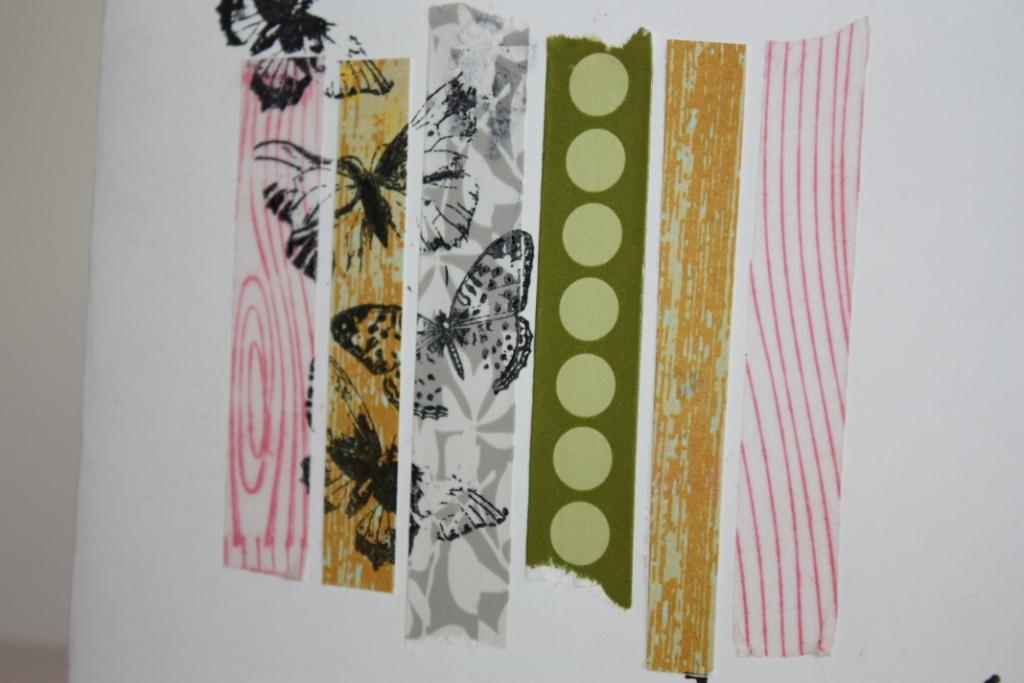
I just added strips of washi tape and cardstock. Then I stamped the butterflies from the Dream Big Itty Bitty set right onto the tape and added the sentiment to the bottom.


I'm entering this into:
Stampin' Sisters in Christ's challenge to use any type of animal, bird, or bug.
 Stacy's Stash challenge over at Sketches 4 All to use pink.


Thanks for looking and leave a comment for your chance to win some stamps!


Supplies:
Unity Dream Big stamp set
StazOn Jet Black ink
Pink woodgrain wash-homemade
yellow woodgrain-Authentique cardstock
grey and green washi - Studio G

Monday, May 14, 2012

Growing in Unity, Day 1

Welcome to my first day as the Growing in Unity gal!
Every day this week I will be posting a project I made using Unity stamps. Visit my blog every day and comment for your chance to win two Itty Bitty stamps of your choice!


So here is my first project this week:

I have a lot of pregnant friends right now so I thought I'd get a head start on some cards for all those little babies! And a lot that already had a baby and STILL need a card from me. : \

I used the stroller from Delight in the Little Things Itty Bitty stamp set and a sentiment I received in a Unity grab bag.

I first stamped the stroller directly on the tag and then again on white cardstock. I fussy-cut the second imaged and popped in on the first for a little dimension.

This is for the Unity Challenge which is to use the colors pink, green, and off white
and for
Stacy's Stash challenge over at the Sketches 4 All group which is to use pink.


Thanks for stopping by and remember to leave a comment for your chance to win some free stamps!


Supplies:
MME Lost & Found Masison Ave paper
Unity Delight in the Little Things stamp
Tattered Rose Distress Ink
Jet Black StazOn ink
American Crafts ribbon
Basic Gray brads
Tag from Unity

Saturday, May 12, 2012

Paper Girls Challenge #7

I forgot to post my sample for The Paper Girls Challenge!
We are on challenge #7 already. It's a sketch hosted by Charity:

And here is my take on it:
There is supposed to be journalling on the red star. I just haven't gotten around to it yet!

I hope you get a chance to join us with this sketch and win some crafty goodies. You have until Friday, May 18th to link up!


Wednesday, May 9, 2012

SP and Company Orange Blog Hop and New Release

This month's color is Orange! After you're done hopping around today, make sure you play along with this month's Orange challenge (click here for details) for a chance to win some awesome SP and Company prizes!


Join us for our Release Celebration that is happening today and tomorrow on the SP Forum HERE.  You can talk to all of the designers, discuss projects and chit chat with other stampers!It's a blast and you don't want to miss out!


Don't forget that the random prize patrol is watching so leave a comment on every blog to be eligible for the prizes!! The more blogs you comment on, the better your chances are of winning something fun! Our GRAND PRIZE this month is one month in the SP 6x6 Stamping Kit Club! The grand prize winner will receive a newly released 6x6 paper pad from Echo Park + a newly released SP & Co stamp set as their kit.

~~~~~~~~~~~~~~~~~~~~~~~~
Here are the projects I made for our blog hop. I didn't realize how much I liked orange until I started playing around!

This first one uses the Even Bolder Sentiments: Many Thanks set. The stamp is so big I didn't need much else on the card other than the fussy-cut flowers!

 And the rest of my cards use Bold Sentiments III: Birthdays. There are thirteen big and bold sentiments in this set!

washi tape candles:


This last one also uses Echo Park's Birthday Boy Baners paper. I love cutting out those fun banners to add to projects. I thought it could also use some confetti, but now I think the paper looks like it has chicken pox!

This set has so many fun stamps that I just wanted to keep going and use them all up! But I stopped myself after three. I'm sure you'll be seeing much more of this set in the future!
Thanks for stopping by!!
~~~~~~~~~~~~~~~~~~~~~~~~
 
 
Make sure you check out the SP Blog to see what Samantha did with the new stamps! And don't forget to hop around to each Design Team Member's blog - there are brand new projects with the stamps that came out TODAY to inspire you!


Here is the list of designers that will inspire you today:


Amber {you are here!}


Sunday, May 6, 2012


So it is mini cards week over at SP & Company. My favorite size of mini card to make is a 3"x3". For one, they are just so dang cute! And secondly, I can get 8 of them out of one 12x12 sheet of cardstock.
The easiest way to make these is to cut your 12x12 cardstock in half. Then cut each half into 4 3"x6" pieces. Score each piece and there are your card bases.

I decided to go really simple with these cards. I stamped the flower from the For Every Woman set and colored it in a few different colors. I always make sure to stamp in a permanent ink like StazOn so that the ink doesn't bleed with my markers. Then I fussy cut the flowers. You could use the coordinated svg file if you are not a fan of fussy cutting. I like fussy cutting. I find it a bit relaxing!

I just used foam tape to adhere the flower to the center of the card. Then stamped the Thank You sentiment from Ultimate Sentiments II . While I wanted these to be simple I still felt like they were missing something. So I inked the edges just to give it a little something extra.


After I had all the cards assembled and together I thought it was a bit too much yellow. So I cut some more bases in an aqua color and stamped the Hello sentiment on it.


Now each recipient will get half yellow and half aqua! Plus, they can use the cards for more than one occasion.


Thanks for stopping by today! Check out the SP blog for more stamping inspiration!

Tuesday, May 1, 2012


If you came here looking for the Paper Girls Challenge blog hop you can find it here. But feel free to finish reading this first!

Here's a little gift card holder I whipped up for my SP&Company Design Team post.

This one is very simple since it is for a Father's Day gift. And men don't care for all the fuss and layers and dimension that we do!
I started by cutting a piece of double-sided cardstock to 4"x10". I drew a little diagram with the measurements for the size and score lines. Along the short short side you will score at 1.25", then again 3 and a half inches away, again 3 and a quarter inches away, and finally again at 2 more inches away. It seems like a lot of score lines but there is also a pocket on the inside for a little note. I hope this makes sense. I'm still sick and still functioning on little sleep!

Then fold up that bottom 2" section, then fold up the 3.25" section, and then fold down the top 1.25" section.
I make a notch to hold it closed with a notch tool, but you could use a craft knife as well. To do so I lightly mark with pencil right under the center of the top flap.

I then press the notch tool to cut out the half-circle notch and erase the pencil mark.


Now the flap can tuck into the notch and stay closed.

To decorate I simply attached a simple brown scallop to break up the stripe patttern on the front.

On the inside I added a white panel and cut out two notches to hold the gift card. This iTunes gift card was just sitting on my desk so I used it but in reality this would be a Bass Pro Shops card or something with all the fishermen in the family!
Oh, and almost forgot to mention that the pocket is made by adhering the sides of the bottom 2" panel. This is so you can include a little note.

And finally I used the sentiment from the Father's Day Fun set. It's so big it fits across this 4-inch pocket!
Thanks for stopping by and make sure you check out the SP Stamps blog for more inspiration using their stamps!

Monday, April 30, 2012

The Paper Girls Challenge blog hop!

Welcome to The Paper Girls first ever blog hop!
We're so happy you're hopping with us!!

{First of all I want to apologize in case my post doesn't make sense! It's been a loooooonnnngggg week. I'm running on very little sleep, survived tornadoes, power outage, and now to top it off I think I have the flu. So I hope you can make some sense of this all!}


I love that we chose to make ATCs for this hop . I made several with a Spring theme:

My first one is very simple - I cut out some Webster's Pages paper, stamped "Spring time", added a die-cut butterfly,  attached a ruffle of washi tape at the top, and glittered the butterflies and flowers.


I'm starting to acquire quite the washi tape collection so I thought I could utilize that stash to make an ATC. I attached diagonal strips of tape to white cardstock, made a tape flower, added a tape banner, and then stamped the word bloom.


The last one is my fave:
I misted white cardstock with blue glimmer mist, stamped a brown branch, punched white flowers, added a yellow glittered center, inked the edges gray, and added 3 butterflies.
But I feel like it needs a sentiment. Or am I wrong? Let me know what you think!
Also linking this to Stampin Sisters in Christ challenge #137 which is to use your "green thumbs", meaning something planted or something green.


Here's a reminder of what you can win on the hop:
Man, I wish I was eligible to win. ; )
I love that monster paper!
And who couldn' use an adhesive dispenser??


Want to win? Get one entry for:
Extra credit:
Want to have more fun after seeing all of the inspiring projects? Join in! Link up an ATC created by you and you will get an extra entry for the prize!

International readers are welcome to play along but currently we are only shipping prize packs to the US and Canada due to shipping costs.
Here's the hopping order:

Thanks for playing and GOOD LUCK!!!