Pages

Monday, July 23, 2012

Paper Girls Challenge #12

Charity is the host of challenge #12 at The Paper Girls Challenge.
She challenged us to use a mesh bag (what you get when you buy a big bag of apples or onions) on our creation. 


Can you find the mesh on my card? Well, technically it's not on the card. BUT - I did use the mesh as a mask to create my pink background! I used repositionable spray adhesive to attach the mesh to my card front. Then I misted some pink spray and then removed the mesh leaving a white pattern.


This card is for my 5-year-old niece so I decided to use this cute little stamp from Crafter's Companion from their Swalk collection. I colored her in with watercolor pencils and I made a bouquet of 5 flowers popped up with foam. The stem is just a skewer painted green. I had actually wanted to add some stick pin banners but it didn't fit well so I decided to turn it into a bouqet instead.


I wish the lighting was better when I took these photos - the colors look so washed out online. Oh well!

Please stop by and play with us at The Paper Girls Challenge blog! We always have a fun crafty prize to give away!

I'm entering this into Crafter's Companion current challenge which is Anything Goes.

Thanks for stopping by today!


Supplies:
Crafter's Companion S.w.a.l.k Thank You stamp set
Stampin Up watercolor pencils
Sakura white Glaze pen
My Little Shoebox letter stickers
Stampin Up pastels

A networking blog hop

I am participating in this monthly Networking Blog Hop I found.


Are you ready to network??
Are you prepared to make some new bloggy friends??
Well, here’s your chance!

RULES:
Link up to the homepage of your blog.
….follow Host and Co-Hosts {pretty please} feel free to follow by Facebook, Twitter,or whatever works best for you!
….hop // network // have fun!

Live.Laugh.Rowe is the host of this hop

And here are the co-hosts:
So click on over to Live.Laugh.Rowe and start hopping. There is a great variety of different blogs. I'm sure you'll find several you'll love.
  

Save the Date!  Next Hop: 8/19

Stitched together with love

Today for my SP stamps card I've got a little quilt-inspired card. I have an older stamp set, Sewing Chic, that I haven't used much. So I challenged myself to use it this week.
The Stitched with Love sentiment from that set just reminded me of how much of a sewer I am not. I wish I could be so crafty as to whip up quilts and blanket, skirts and dresses, curtains and slipcovers, and all that wonderful stuff to fill my house with joy! Ha! But my machine just hates me. I'm convinced of it!
I may not be able to manipulate a sewing machine and fabric, but I sure as heck could whip out something with cardstock and a paper trimmer!
To make the quilt I created a mask by cutting out a square from some paper. I set it down on my cardstock and stamped a pattern, moved the square over making sure to completely cover the previously stamped image and stamped my next pattern in a different color.
In total I used four different colors and patterns. My stamps were Circletastic, Bold Houndstooth, Large Polka Dot, and the grid from Journal This.
I drew black stitches around each square and decided to tie some thread at all the intersections. I'm convinced if I ever made a real quilt I would do this too. It seems like a nice touch! I'm also convinced my real quilt would also be as wonky crooked as this card!
Thanks for stopping by today!


Supplies:
SU Basic Black cardstock
SP stamps: Circletastic, Bold Houndstooth, Large Polka Dot, Sewing Chic, Journal This
SU Crumb Cake and Basic Black ink
Distress Inks: Weathered Wood, Ripe Persimmon, Seedless Preserves
Divine Twine Black Licorice

Saturday, July 21, 2012

Thanks a Bunch

Today I colored up this super cute little Teddy Bear named Popcorn from Crafter's Companion.
 He's from the Thanks a Bunch set.

I love those big floppy flowers he's holding!


After I mounted my image to the kraft cardbase I realized it needed a mat. So I traced around it with a black marker to give the appearance of a thin black mat.


I just tied some yellow twine to finish it off!

I'm entering this into Crafter's Companion's July Challenge which is Anything Goes.


Thanks for stopping by today!

Supplies:
SU Crumb Cake cardstock
SU markers
Bic Mark-it markers
Stazon on Jet Black ink
SU Basic Black ink
Twinery twine

Wednesday, July 18, 2012

Celebrate

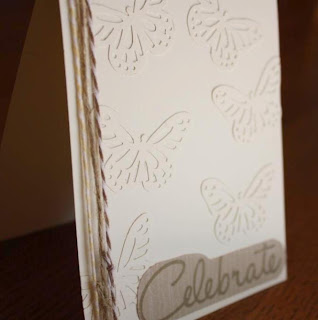
Today for my SP & Company post I have a beige card. I know that sounds so dull and boring, but beige can be fun! Right??
I picked beige becasue I wanted to do this faux embossing technique and I thought it would look pretty on vanilla cardstock. So here's my card:


I punched several butterflies in the same vanilla cardstock as my card base and adhered them randomly to the card.


I know it might be hard to see so I took photos at several different angles hoping it would help!


I attached twine in three differing colors of beigeness. I stamped part of the new Take time to Celebrate stamp onto some EP So Happy Together paper in a kraft-colored ink.


To only partially stamp an image you can either color in the parts you want with a stamp marker or you can tape off the parts you don't want, ink up the stamp, remove the tape, and then stamp. I like to use washi tape for this since it doesn't leave a residue on the stamp. And now you have another excuse to acquire more washi tape! You're welcome ; )


Supplies:
SP&Co Take time to Celebrate stamp
SU Very Vanilla cardstock
EP So Happy Together Crisscross paper
Martha Stewart butterfly punch
SU linen thread
Twinery twine in Buttercream and Cappuccino
SU Crumb Cake ink

Friday, July 13, 2012

For You

This little card is inspired by the current challenge over at Runway Inspired Challenge:

The inspiration photo for the challenge is this:
Super fun!

So I wove some blue twine, orange twine, and linen thread (ugh - very time consuming!!) for the background behind a punched butterfly.

 I popped the front panel and tied the same twine around the front and then stamped this little sentiment from Crafters Companion.
I'm also entering this into Crafter's Companion challenge which is anything goes. The For You stamp is from their Poppies and Daisies set by Sheena Douglas.
Thanks for stopping by today!
Supplies:
SU Crumb Cake and Very Vanilla cardstock
Crafters Companion Poppies and Daisies stamp set
Twinery twine
SU linen thread
SU Brilliant Blue ink
Martha Stewart butterfly punch

Wednesday, July 11, 2012

Happy Birthday

Hello stampers! Today for my SP & Co DT post I've got  a little birthday card I made using the new Boutique Sign mini stamp set that was just released.

I started by inking my vanilla cardbase with brown ink.
Then I sprayed a doily pink and red.
I inked up a tag with brown distress ink.
I embossed the sign and hanger with metallic copper.
The sign is fussy cut from white cardstock.
The patterned papers are from EP So Happy Together (which was part of the June SP monthly kit and is SOOO cute).

The sentiment is from Bold Sentiments III: Birthdays.

Then I embellished with red and pink twine and a couple buttons.

 
I'm entering this into Stamping Sisters in Christ's recipe challenge to use at least 1 round or oval element (the doily, check), at least 2 different papers (check), and at least 1 embellishment (twine and buttons, check!)


Thanks for stopping by today!


Supplies:
SU Very Vanilla Cardstock
Wilton doily
Tag from Unity
Papers: EP So Happy Together
Pick Your Plum twine
Basic Grey buttons
SP and Company Boutique Sign mini stamp set
Zing Metallic Copper embossing powder
Versamark watermark ink
SU Early Espresso ink
Tim Holtz Old Paper and Gathered Twigs Distress inks
Tattered Angels Mel's Diner and Pink Cadillac sprays


Monday, July 9, 2012

SP & CO stamps blog hop

Welcome to our monthly blog hop and stamp release for SP and Company stamps!

This month's color is Royal Blue! After you're done hopping around today, make sure you play along with this month's Royal Blue challenge (click here for details) for a chance to win some amazing SP and Company prizes!


 Are you itching to win some stuff???!!! Then don't forget that the random prize patrol is watching! Leave a comment on every blog to be eligible for the prizes!! The more blogs you comment on, the better your chances are of winning something fun!


Hi, folks! Welcome to my stop on the blog! So here's what I created for you today:


I used the brand new Even Bolder: Time to Celebrate single stamp on my banner along with the stars from the All Zipped Up set. Isn't that new stamp wonderful? I just love big sentiment stamps like that!

Then I made the hanging banners out of EP Dots & Stripes Metropolitan (blue) and
EP So Happy Together (red).
Thanks for hopping with us today!


Make sure you check out the SP Blog to see what Samantha did with the new stamps! And don't forget to hop around to each Design Team Member's blog - there are brand new projects with the stamps that came out TODAY to inspire you!


Here is the list of designers that will inspire you today:


Chrissie

Vicki 

Kelli

Michelle

Amber

Vera


Thank you card

This week at The Paper Girls our challenge is for you to use rubons. I'm sure you have some somewhere in your big stash of crafty supplies! For my example I've got a little Thank You card.

The sentiment, dotted line, and flower and leaves are all rubons. Rubons that I've had for years and just finally decided to use them.

For my card I used the sketch from the July Authentique sketch challenge and the colors from their June color challenge.

I'm also entering this into Young Crafters Unite challenge to use many layers.

The tan paper is Authentique's Foundations from the Glowing line.
The orangish paper is from Authentique's Free Bird Endless line.
And the light blue is from their Gathering line.

On top of the paper I've added my rubons, then some pearls, twine, and butterflies.
Thanks for stopping by! And come play with The Paper Girls for the chance to win some crafty goodies!


Supplies:
Authentique paper from Glowing, Free Bird Endless, and Gathering
SU rubons, butterfly die, linen thread
Twinery orange twine
I-rock pearls

Friday, July 6, 2012

Congratulations - baby girl card

Today, I've got another SP & Company DT post in the form of a really fun and layered Congratulations card for a new baby girl.

To make the frame I cut 2 strips of brown cardstock at 5.5" and 2 strips at 4.25".
To make the mitered corners I laid one strip over another as shown below.
Then I drew a line from the outer corner to the inner one and then cut along the line.
You could do this with all 4 pieces but I only did the 2 long pieces (just in case they didn't quite line up. I didn't want the background showing through from behind).

I stamped all 4 pieces with the new Wooden it be Nice woodgrain set and created the frame around my card front, making sure the mitered pieces went on top of the other 2 strips.

For my background I "stamped" on some clouds on aqua cardstock. I simply used bubble wrap and white pigment ink and just blotted until I got a soft cloudy image.

 For the baby clothes I created this template and cut out three, one on plaid patterned paper (MME Dolled Up) and the others are stamped with Large Polka Dots (in pink onto red paper) and Bold Houndstooth (in yellow onto white paper).

Then I just embellished with a ruffle made by running a stitch on seam binding, a flower, and a belt for some fun girly touches. The center of the flower and the belt buckle are drawn with Sakura glaze pens for some fun and shiny texture.
 I glued down a length of twine and created clothespins out of kraft cardstock to "hang" the clothes.

 Then I added the Congratulations sentiment from Ultimate Sentiments II

And finally I added some decorations to the frame itself with diecut butterflies and punched flowers.


I'm also entering this into the Young Crafters Unite challenge to use many layers.

And into the Stampin Sisters in Christ challenge to use something new (my woodgrain stamp and one of the flower punches).


Thanks for stopping by today!
 
 
Supplies:
SP&Co Wooden it Be Nice and Ultimate Sentiments II stamp sets
Colorbok brown cardstock
MME Dolled Up (plaid paper)
EP Paradise Beach (red paper)
StazOn Jet Black ink
7gypsies seam binding
SU Punch Pack (small 4-petal flower)
SU Beautiful Wings butterfly die
McGill Mini Petals punch (5-petal flower)
SU Boho Blossoms punch (6-petal flower)
Studio G white ink, pink ink
SU Daffodil Delight ink
Sakura Glaze pens
Twinery Twine

Rainbows and Sunshine

It's coloring techniques week over at SP & Company stamps and today I'm going to show you one of my fave coloring techniques. It's so simple - just add the color directly to the stamp!

I used a sentiment from the Sympathy & Care set and simply colored it in with stamp markers.
Once the entire stamp is colored you'll need to huff the stamp (just breathe on it as if cleaning a DVD or your sunglasses) to re-wet it since most of the ink has probably dried by the time you're done and then stamp it.

For my card front I used paper from the EP Paradise Beach 6x6 pad. On top of that I added a smaller black cardstock panel, then 3 hand drawn and cut grey clouds, rhinestone rain, and yellow twine. Over the twine I added my sentiment banner with foam. And finally I added two more rhinestones to the banner.

Notice the silver lining on the clouds? I thought they was a nice touch with the sentiment. :)


I'm entering this into the Young Crafters Unite Challenge #11 which is to use many layers.

And into Stampin Sisters in Christ's challenge to use something new. My new item is the silver ink - I still had the plastic on it! I love this ink and wish I had used it sooner. And the patterned paper is newish too.

Thanks for stopping by today!!


Supplies:
SP&Company stamp - Sympathy & Care
EP Paradise Beach 6x6 paper
SU Basic Black cardstock
American Crafts stamp markers
I-rock gems
Twinery Twine
Glimmer Mist (on clouds) - Route 66, Black Magic, Charcoal (Chalkboard)
SU Encore Metallic ink pad