Pages

Showing posts with label decor. Show all posts

Sunday, October 18, 2015

GIU Day 5, wonderful mess

It's the 5th and final day of my Growing in Unity week!
 I posted 5 projects this week using Unity Stamps. And you can be 1 of 2 winners to win a bag of 25 stamps from Unity! Just comment on my posts for your entry every day.
Since I am posting a couple days late I will give you through Monday to leave comments and draw the winners Tuesday.

Today I have a paperboard letter I picked up at the craft store and decorated for my craft room. It started out a kraft color. I painted it a poppy red color. I stamped parts of the Up Against a Wall brick stamp. And then distressed with a few gelatos.

The sentiment is from the You Are Important stamp set.
The leaves are from the Wildflowers & Wings set.


I finished it off with a Prima flower and yellow twine.

Thanks for visiting my blog this week! Come back on Tuesday when I announce the winner. And thanks to Unity for sponsoring Growing in Unity!

Friday, October 2, 2015

Fall Coffee Lovers Blog Hop, part 2


Here is my second entry for the Fall Coffee Lovers' Blog Hop!

I fell in love with this coffee cup svg file from SvgCuts a few weeks ago. I purchased it knowing I would have to make one for this blog hop.

So here it is:

 This cup is made from scrapbooking paper. I got a little messy on the lid, but I'll change the blade out on my Cricut next time and use less glue! :)

From her left side:

And her right:

 And the lid comes off. I'm not sure if I'll use this as a gift holder of some sort or not. Honestly, I love it so much I think I will just keep it in my craft room as decor.

The paper is an old SU pack I've been hanging on to for a few  years called Autumn Meadows. My leaves and acorn are die cut from watercolor paper and painted with a water brush and distress inks. Then I finished it off with a Simple Stories chipboard banner and a fabric flower.

I love making 3-d objects from paper!

Thanks for stopping by and have a great weekend!

I'm also linking up to:
Simon Says Stamp Wednesday Challenge - Anything Goes

Monday, September 30, 2013

Fall Decor blog hop

 
Welcome to The Paper Girls Challenge blog Fall décor blog hop!

The Paper Girls have some wonderful fall-themed décor projects for you.
 And what's a blog hop without a prize??
We are offering up a $26 gift card to ScrapbookPal.com!

 What do you have to do to participate? 
Complete all 3 of these required steps:
1. Comment on each of our blog posts along the hop
2. "Like" the Paper Girls Challenge on Facebook
3. Follow our blog
Easy peasy, right?
 
 You have until Sunday, October 6, 2013 at 11:59 pm MST to comment. We will announce the winner on Wednesday October 9, 2013 at 9:00 am MST.  As usual, we are only shipping prize packs to the US and Canada due to shipping costs. We really hope to change this in the future.
 
You should have come here by way of Kristy. Wasn't her project great?! I love that she can change it up for the seasons!
 
So, here's my project now:
I used the 3D Letters cut file from svgcuts.com to make these out of cardstock for my mantel.
Seriously. This file makes it so easy to create word, initials, etc. without going out and buying expensive wooden or chipboard letters! I use them a lot :)
 
 
Some close-ups:


Here's a reminder of your hopping order:
 
Amber: www.allamberallthetime.blogspot.com  ....psst You are HERE!
 
So now you are headed over to the ever-so-talented Erica! If you love the tiny bits of book page I used then you will LOVE what she did with her book pages! Thanks for stopping by and hopping with us today. Good luck winning the gift card!


Sunday, June 2, 2013

TMNT birthday party

Teenage Mutant Ninja Turtles!
Heroes in a half-shell.
Turtle power!
I love that my kids watch a show that I watched as a kid!


My middle son has become a fan of TMNT. So we decided it would make a fun theme for his 7th birthday party.
I created this invite in my SCAL2 software and cut it on my Cricut.


 I made him a banner in the turtle colors and the balloon idea is from here. It's just crepe paper and paper eyes. I cut white ovals and drew the black pupils. Only I forgot to give mine mouths!
 (p.s. I know there is supposed to be an orange turtle and not a yellow one. But I could not find orange crepe paper in my town!)
We served pizza for lunch since that is the turtles' favorite food after all!
He wanted his cake to look like a pizza too. I baked the cake in a large round cake pan (14" maybe), frosted with tan frosting (white frosting tinted with brown, yellow, and peach color gels) , used red frosting for the sauce, grated white chocolate for the cheese, fruit rollups for pepperoni and bell peppers, and licorice for the olives.
 
I found these cute Lego candles and just had to use them! (nothing to do with TMNT but they are cute.)
I made these cute mini pizza boxes from kraft paper (I think the svg template came from here) and gave the kids a decorated sugar cookie to take home.

 I set up a cookie bar with sugar cookies, red, green, black, and white colored frostings, sprinkles, and lots of candies. There are these pouches of cookie icing from Betty Crocker that are easy for kids to squeeze out. And it dries fairly quickly making it somewhat easy to get these home without too much mess. I set out a pizza and a turtle cookie for inspiration. Here's what's left of poor Leonardo...
I'm told he was delicious! His mask is fruit rollup and the candy eyes are from the baking section. The kids may have eaten the fruit rollups and had to create the masks from icing which worked out even better!

These pizza cookies are made with red icing, shredded coconut, grated white chocolate, black licorice, and green fruit rollups.
The kids came up with all kinds of crazy cookies. I wish I took pics of them! I only got one plate that one of my kids made:
 Our little cookie taste tester!
The boys also got to make their own Mutagen Ooze! This was such a huge hit and everyone loved it. It was so easy to make too. Recipe found here. It's just made of water, borax, clear school glue, and food coloring. Instead of the cool container in the link I just used these food containers I found at Walmart. They were inexpensive (a pack of 4 for a buck-something), the lime green lid matched the party!, and the container is wide enough that kids can play with the ooze without removing it.
 Such a fun party!
My birthday boy:
 Oooooohhhhhh....I almost forgot! See that green punch the boys are getting above?
We called it Ooze punch. I wish I took a pic of that too. It was just powdered lemonade mix and soda. Take enough powder to make 4 quarts. Add just enough water to dissolve it. I probably used a couple cups. Stir and add lots of green food coloring. Then add in 2 2-Liter bottles of lemon-lime soda. I just happened to use Sierra Mist. This got more compliments than I ever expected it would.
 It's a really weird and fun green color:

I decorated the table with a black tablecloth and added strips of yellow washi tape to make it look like a street. (The turtles live under the streets in the sewer you know.) I spray painted a small bucket so that it looked like a sewer pipe (idea from here) and added some of his turtle figurines for décor around the pipe. Of course at this point someone had already spilled punch and everything was moved. See all the wet blue napkins?? :)  Believe it or not I just happened to have a bunch of 12" pizza pans from Dollar Tree just laying around left over from another project so I used them as a charger at each place setting. I thought they went with the pizza theme, of course, but also looked a bit like a round sewer cover too!
The kids left with an armful of goodies. I found these giant coloring books a few weeks ago for $1 at Wal-Mart and snatched them up. I also found TMNT cups at Wal-Mart that we used at the party. They each took their cup, pizza cookie (not pictured here), picked a balloon, plus took all their cookies and ooze.
Thanks for stopping by today!

I would love to know if you use any of these ideas. Please leave me a comment with a link to your blog so I can see your party too!


Monday, February 4, 2013

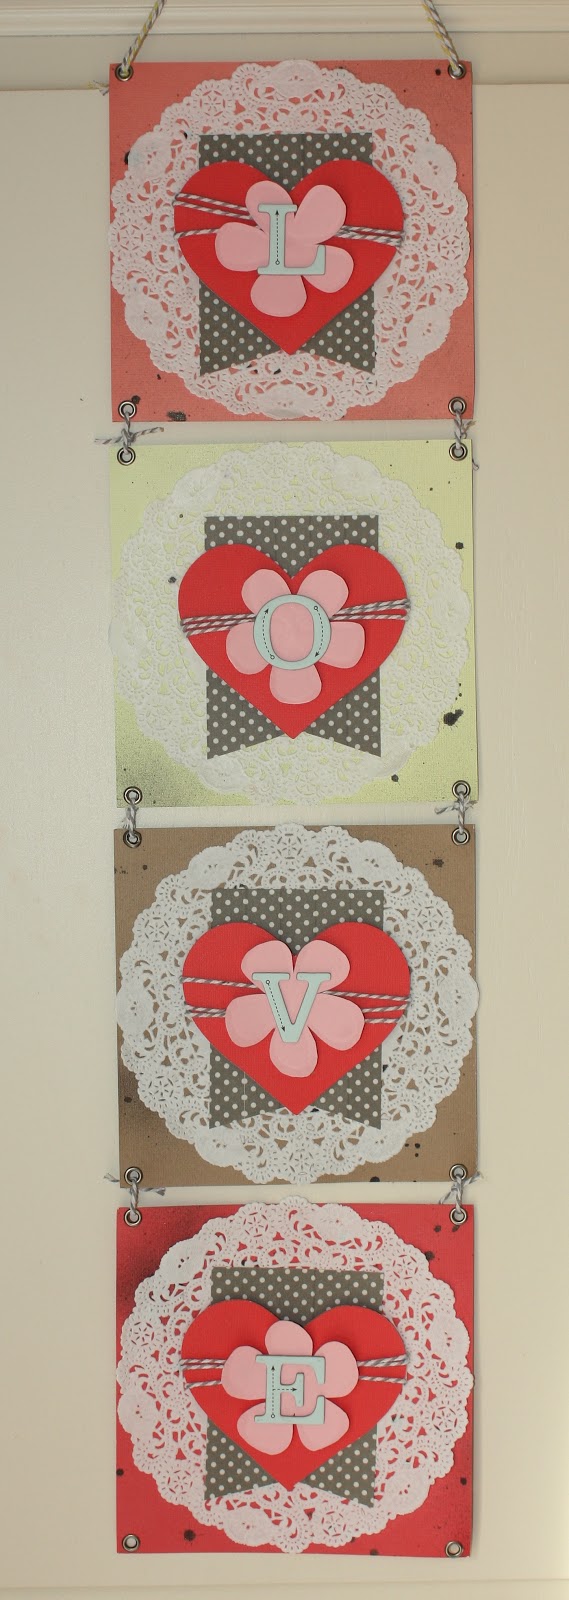
LOVE

The current challenge at The Paper Girls Challenge blog is to use twine!
 
I love twine. But you probably already know that :)
 
Instead of a card I came up with some wall art for Valentine's Day.
 
The piece is hung using twine, each panel is connected using twine, and each heart is wrapped in twine.
 
Each panel is 6" x 6". Here's some close-ups:
 Spray ink, doily, banner, heart, twine, flower, chipboard, and eyelets.
 
All the layering gave them some fun dimension:

 
Thanks for stopping by today!
If you get a chance we'd love for you to play along in the twine challenge!

Also, I am the Growing in Unity girl at Unity Stamps this week which means I post a project every day using their stamps and when you comment on those posts you'll be entered to win 2 Itty Bitty stamps of  your choice! So stop by every day this week and look for the GIU posts.
 
And, finally, I am a finalist in the Top 25 Love/Valentines cards over at Practical Scrappers. Each week readers vote and the top vote-getters move on to the next round. Please head over there and vote if you don't mind! Voting for this round is open through Wednesday, February 6th. You can only vote once but for as many of the contestants as you like! I made the "Through Rain or Shine" card with the umbrella. Please vote for your favorites! http://www.practicalscrappers.com/2013/02/top-25-cards_7732.html


Friday, January 4, 2013

Scrapbook Steals blog hop

Welcome to the last stop on the ScrapbookSteals January blog hop!


If you just happened along here and don't know about the hop then scoot on over to the ScrapbookSteals blog to start at the beginning and maximize your chance to win the $20 gift code! Also, make sure you check out their daily deal website for some great deals on scrapbook supplies!
 
  I was so excited to be part of another Scrapbook Steals blog hop! I was even more excited when I learned that I would get to work with a new-to-me product -  Kiwi Lane Designs Borders. Lots of my online crafty friends rave about these products and I finally got to work with some!
    I was given the Mini Scallops Border set and here's what I created:
     I used them to create the fun layered borders on this plain white frame I decorated for a friend.
     I used all three sizes that come in the kit, then clustered some coordinating chipboard, rubons, and flowers to finish it off.
     
    I also made a card using the scallops to create an edge on the right side:
    These things are so darn easy to use - just trace and cut with scissors. Easy peasy.

    
Here is a reminder of the blog hop order:
Thanks for hopping with us!
Kiwi Lane is also offering up a prize! Head over to http://kiwilane.com/here/blog/ for a chance at their $25 prize!
 
AND I'm also giving away some blog candy to my followers! I did a little craft room cleaning and found some doubles of things I'd like to give away. Everything but the ribbon and stamps are from ScrapbookSteals!
Just make sure you are a follower and leave a comment on this post. You have through this weekend to enter. Up for grabs is:
MME Lost & Found Union Square 6x6 pad
DCWV 10-pack white cards and envelopes
SP & Co Bold Sentiments I stamp set
MME Indie Chic Pictures washi tape
MME Miss Caroline Dolled Up twine
Stampin Up pleated satin ribbon in Blushing Bride
MME Stella and Rose Mabel titles pack
MME Laundry Line titles
2 American Crafts Flower Shoppe paper flower packs

Monday, June 4, 2012

Paper Girls Challenge #9

This is my second post of the day. For my SP DT post see here.
--------------------------------------------

It's time for Challenge #9 already over at The Paper Girls Challenge blog!

This one is hosted by Erica and she has issued us the challenge of using subway art!

Now, this is not anything I would have tried on my own, but I sure am glad I did.

Not sure what subway art is? Try these samples over on Pinterest.

I thought this would make a nice Father's Day gift. So I asked my boys (ages 8, 6, and 2) some words that describe their dad. Here's what we came up with!


 I created the actual word collage in Microsoft Publisher using a combo of WordArt and text boxes and then dropped in a couple photos. I printed on white cardstock, mounted on blue cardstock, black label, and placed on 12x12 white cardstock.

I then embellished with stars, brads, and banners.

 I placed it in a 12x12 shadow box.

Hopefully, this will help liven up his rather dreary office!


I hope you play along with us in this challenge! You can create a layout, card, or altered item.

As always, one winner will be chosen at random to win an assortment of crafty supplies!

Thanks for stopping by!!