Pages

Monday, April 30, 2012

The Paper Girls Challenge blog hop!

Welcome to The Paper Girls first ever blog hop!
We're so happy you're hopping with us!!

{First of all I want to apologize in case my post doesn't make sense! It's been a loooooonnnngggg week. I'm running on very little sleep, survived tornadoes, power outage, and now to top it off I think I have the flu. So I hope you can make some sense of this all!}


I love that we chose to make ATCs for this hop . I made several with a Spring theme:

My first one is very simple - I cut out some Webster's Pages paper, stamped "Spring time", added a die-cut butterfly,  attached a ruffle of washi tape at the top, and glittered the butterflies and flowers.


I'm starting to acquire quite the washi tape collection so I thought I could utilize that stash to make an ATC. I attached diagonal strips of tape to white cardstock, made a tape flower, added a tape banner, and then stamped the word bloom.


The last one is my fave:
I misted white cardstock with blue glimmer mist, stamped a brown branch, punched white flowers, added a yellow glittered center, inked the edges gray, and added 3 butterflies.
But I feel like it needs a sentiment. Or am I wrong? Let me know what you think!
Also linking this to Stampin Sisters in Christ challenge #137 which is to use your "green thumbs", meaning something planted or something green.


Here's a reminder of what you can win on the hop:
Man, I wish I was eligible to win. ; )
I love that monster paper!
And who couldn' use an adhesive dispenser??


Want to win? Get one entry for:
Extra credit:
Want to have more fun after seeing all of the inspiring projects? Join in! Link up an ATC created by you and you will get an extra entry for the prize!

International readers are welcome to play along but currently we are only shipping prize packs to the US and Canada due to shipping costs.
Here's the hopping order:

Thanks for playing and GOOD LUCK!!!

Monday, April 16, 2012

Paper Girls Challenge #6

It's my turn to host over at The Paper Girls Challenge blog!

I decided to use this photo for the challenge's inspiration:


Here are the projects I created:
For my card I used the colors as inspiration. I took a grey cardbase, yellow woodgrain paper, white homemade washi tape, and yellow dot purchased tape. I fussy cut some Authentique flowers and stamped a sentiment.

I went a little more literal with my layout.
I cut 2-inch squares of clear acetate, then cut 1 3/4-inch squares of Authentique Blissful paper. I adhered the clear squares over the paper (using spray adhesive) so they'd look like the frames in the inspiration photo.

I die cut a branch from the Straight from the Nest cartridge to help anchor my photo.

I hand-cut a banner and stamped my simple sentiment from a Unity/Authentique stamp:

I am entering the layout over at Stampin Sisters in Christ #135 which is to use something transparent.

I also tried to use this sketch from Authentique's monthly challenge:
I initially had hexes cut out but just wasn't feeling it. I stared at my LO for hours. Then I switched to squares and that's when it all came together. The title was moved to the bottom. I added extra squares instead of those hangy things. And added a branch instead of a bow. It's funny how one vision is transformed into something else. I was totally stressed about this project, but then making those few changes turned it into a layout that I finally love!

Thanks for stopping by and I hope you come play with The Paper Girls and the other two challenges!

Card Supply List:
SU Basic Grey cardstock
MME Miss Caroline All Dolled Up
Authentique Blissful 6x6
Unity Stamp Hello My Friend
Up & up printed tape
SU basic Grey ink

LO Supply List:
Authentique Foundations paper
 Authentique Blissful 6x6 papers
SU Basic Grey cardstock
Straight From the Nest cartridge
I-rock and stones
Unity Stamps Authentique co-branded stamp set "you + me= bliss"
SU Basic Grey ink

Wednesday, April 11, 2012

Happy Birthday!

As I was looking at the new SP& Company mini stamp set Father's Day Fun I noticed that I really liked the way the corner of the mustache curved up. So I played around with it trying to create a fun pattern. Here's what I ended up with.


I also used the dot and circle from All Zipped Up which are meant to be the grommets on the pocket. First, I stamped alternating rows of the mustache in green. A row of upside down and then a right-side up row. Just stamp until your card base is filled up. Ideally you won't be traveling like I was. I was working on my score board on a bed while my 2-year-old was jumping on the bed! I really miss my craft desk! But the imperfections just add character right?? ; )


After the green mustaches, I stamped the solid circle from All Zipped up in turquoise in between every other mustache.


Then I used the ring and stamped that in a slightly lighter blue in the other spaces. And that's my background for the card.


Then I grabbed some papers from the Echo Park Birthday Boy Mini Kit and cut a strip from the Stripe Paper. I used the back side which is blue with stars and adhered it toward the bottom of the card. Then I cut out a cupcake from the Journaling Paper and stamped Happy Birthday from All Zipped Up (while 2-year-old is still jumping!). Then some green and turquoise twine finish it all up.

Thanks for stopping by today. I hope I inspired you to look at your stamps in a fun and new way!

For more ideas visit the SP Stamps blog for daily inspiration!

Monday, April 9, 2012

SP Blog Hop!

Thanks for hopping along with us today! Welcome to my little stop on the hop!


This month's color is Lavender (Light Purple)!!! After you're done hopping around today, make sure you play along with this month's Lavender challenge (click here for details) for a chance to win some awesome SP and Company prizes!


Join us for our Release Celebration that is happening today and tomorrow on the SP Forum HERE.  You can talk to all of the designers, discuss projects and chit chat with other stampers! It's a blast and you don't want to miss out!


Don't forget that the random prize patrol is watching so leave a comment on every blog to be eligible for the prizes!! The more blogs you comment on, the better your chances are of winning something fun!


For my projects today I decided to go really clean and simple.
For my first card I wanted to show that this new Father's Day Mini set can be used for more than Father's Day cards.
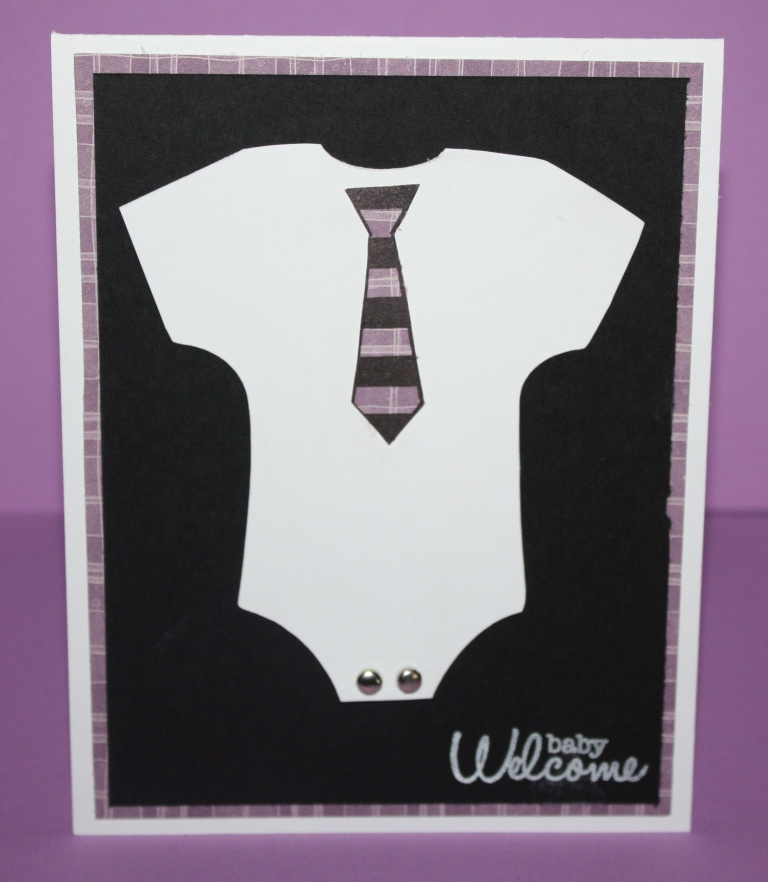
 I stamped the striped tie onto some plaid lavender paper, fussy cut it and added to a little baby shirt that I cut. I added two little brads for snaps, and added a sentiment from Bold Sentiments I.

Next, I made an actual Father's Day card. I stamped all three ties onto the same plaid paper, cut them and adhered to my white card base. 
  I double-stamped the sentiment by first stamping in a lavender ink and then (after cleaning the stamp first!) restamped it in black slightly moving my placement so the lavender looks like a shadow.

Thanks for stopping by and don't forget to leave a comment for your chance to win some prizes! 


Make sure you check out the SP Blog to see what Samantha did with the new stamps! And don't forget to hop around to each Design Team Member's blog - there are brand new projects with the stamps that came out TODAY to inspire you!


Here is the list of designers that will inspire you today:


Chrissie

Vicki 

Kelli

Michelle

Amber


Vera


Monday, April 2, 2012

Happy Birthday

For this week's SP&Company stamps DT project I made a cute little birthday card using the new Mustache Madness stamp set and papers from MME Miss Caroline Dolled Up.

This stamp set is so much fun and even if you don't like mustache humor you can still use it for other occasions! I chose to use the Happy Birthday sentiment - it's just so big and bold!
I used a couple sheets of that beautiful Dolled Up paper from MME to die-cut some balloons. I added some black and white twine for balloon strings.  And then cut out the corners of the card front with a scallopy lace punch and adhered on a white card base. Can you imagine getting balloons that looked like this?? How cute would that be? : )

Now for the inside I decided to use a pop-up die I have of a 3-tier cake. I thought that would be fun! And then I'd stamp another sentiment from Mustache Madness "Where's the Cake?"

So the cake looked great when I first made it. But then after the card is folded the cake gets smashed and just doesn't hold up very well. I think the problem is that I didn't use strong enough tape. I just used my tape runner when the directions suggested using  a strong tape like that red Sticky Strip stuff. I didn't think I had any. Turns out I did. So I will remake this using the stronger tape and see if it helps. I got this die on clearance and I think I might know why it was on clearance. But maybe the tape will work! We'll see....

Just so you know it's also driving me crazy that the cake doesn't match the balloons. I cut the cake first before I knew what papers I'd use on the front. I wish I didn't use that purple. Oh well! The next one will match : )

Thanks for stopping by and if you'd like more inspiration using SP&Co stamps head over to their blog at http://sp.thescrapmaster.com/.

Monday, March 26, 2012

Cupcakes

I wanted to make a thank you gift for about 20 people that were volunteering their time for one of our MOPS events. And I needed an excuse to bake and get it out of my house fast so I wouldn't eat it!
That's how this was born:

 These are some of my favorite cupcakes to make. They are from Martha Stewart's Baking Handbook. White cupcakes with a Strawberry Meringue Buttercream frosting. YUM! Find the reipe for both cake and frosting here.


 To make the toothpick flags you just need toothpicks and cardstock. I, of course, had to stamp mine! I used SP & Company's Ultimate Sentiments II set and Mix 'n Match Sentiments: Friends. I just love these stamps. They have so many possibilites to mix and match! The stamps are small enough to fit on the flag and yet bold enough to stand out.

 One side of the flag said "Thank You" and the other said "You are Super Sweet"!
I cut cardstock into long strips just long and wide enough for the stamps. Sorry, I didn't write down any measurements. After I stamped I cut out the notch and inked the edges in yellow. Then I applied glue and wrapped around the toothpick.

Now came the tricky part. I wanted these all individually wrapped so each volunteer could carry it home and keep it covered in the process. But I wanted a container that was both clear (so the cupcakes could be seen) and that was tall enough to allow for the flag. I didn't have time to custom make 20 boxes. The only premade cupcake boxes in my town were the Wilton ones at Wal-Mart that were neither very cute nor would fit the flags. The only bakery in town is at Safeway and I begged them for ideas. And the brilliant lady there showed me these boxes that they use to sell caramel apples in. Brilliant!! Clear and tall! And only 50 cents each.

So I wrapped each one with a bright spring-colored bow and tucked in a little thank you card containing a small gift card.
 Tada!
These are guaranteed to make them ooh and ahhh. : )


Thanks for stopping by. For more inspiration using SP stamps stop by the blog at http://sp.thescrapmaster.com/.
I have another post there today showing you how to make this pop-up card:


Monday, March 19, 2012

Neighbor gifts...with recipes!

 I finally got around to baking a couple of our new neighbors some welcoming gifts.
Again.
We ate the first batch.
: )

They each got a Chocolate Chip Banana Bread and Lemon Poppyseed loaf.

I wrapped each loaf in parchment paper and then wrapped with some patterned papers. The wrappers I made were about 4"x12" and ended up being perfect to go around the loaf. I just taped it on the bottom and then tied some twine to secure it. Oh, and made a little tag so they'd know what they were eating.

I was in such a hurry to finish these so they could be delivered while still fresh and while there was still daylight outside and before we could eat them again! Well, I put the wrappers on before I stamped them. Then I was too lazy to take them off. So... I stamped the sentiment onto the soft bread. Not my best idea! But it mostly worked : )
 Please forgive any smudges!
I stamped the word Welcome from the Ultimate Sentiments II set. It actually says Welcome Baby but I didn't ink up the Baby part.
Then I used Mix 'n Match Sentiments: Basics for the FROM OUR HOME TO YOURS part.

Whew! They also got a cute little card but I didn't get a photo of that.
Here are the recipes in case you're interested!
Chocolate Chip Banana Bread
1 stick butter
1 cup sugar
2 eggs
1 1/2 cup mashed banana (about 3 bananas)
1 tsp vanilla extract
8 oz sour cream
1 cup quick cooking oats
1 1/4 cup flour
1 1/4 tsp baking soda
1 tsp baking powder
1 cup chocolate chips, give or take
Cream butter and sugar until blended. Mix in eggs. Add banana, vanilla, and sour cream and mix well. Combine oats, flour, soda, and powder and then slowly add to creamed mixture. Stir in chocolate chips. Pour into two greased and floured loaf pans. Bake 40-45 minutes at 350 degrees.

Lemon Poppyseed Bread
1 box of lemon cake mix (standard 18.25 oz size)
1 box instant lemon pudding (3.4 oz)
1 cup water
1/2 cup vegetable oil
4 large eggs
1 Tbsp poppy seeds
2 Tbsp sugar
1/2 cup lemon juice
Combine cake mix, pudding mix, water, oil, and eggs. Beat on medium speed until well blended. Stir in poppy seeds. Pour into two greased loaf pans. Bake at 325 degrees for 60 minutes. Combine lemon juice and sugar. Brush all over warm loaf
ENJOY!
For more inspiration using SP stamps head over to the blog at http://sp.thescrapmaster.com/.
Thanks for stopping by.

Monday, March 12, 2012

Happy Birthday

Here's a simple card using a rainbow of colors:

I stamped the sentiment from SP&Company's Mustache Madness set. That mustache in the set is so wonderful, but the set has so many other uses as well!

I stamped in ROYGBIV order and ended in black.

A touch of rainbow ribbon and that's it!

Thanks for looking!!
 
For more inspiration using SP stamps head over to the blog at http://sp.thescrapmaster.com/.

I mustache you a question...

Wanna see how to make this fun card?


Head on over to http://sp.thescrapmaster.com/ for my Design Team post and instructions on how to make it!


Saturday, March 10, 2012

Scrapbook Steals blog hop

***UPDATE-HOP IS OVER AND WINNER HAS BEEN SELECTED***

I'm part of THREE blog hops today! This post is for the Scrapbook Steals hop. Click here for the SP & Company stamps hop. And don't forget Unity's weekly Friends with Flair hop. There are prizes on each one so please hop!!
******************************************************************
Today I am lucky enough to be part of Scrapbook Steals' first ever blog hop! You all know they are my favorite online retailer for discounted scrapbooking supplies! One lucky commenter will be drawn from one of the participating blogs to win a $20 gift certificate! So make sure you comment on all the blogs for the most chances to win!

There are so many cute buttons and brads included in today's steal from Basic Grey. So I decided to make a few projects! This first one is what you saw on the SS website.
 I decided we needed some Spring decor in our house so out came some canvas, paint, paper, Mod Podge, flowers, stamps, ink, Glimmer Mist, scissors, and a hot glue gun!

 The buttons are just adorable as centers for the flowers and as blossoms in the tree.
And now my kids are happy that we have something decorative on the walls!

Then I noticed that the buttons were about the same size as some magnets that were laying on my desk. You have random magnets just laying on your desk too, right?? : ) So I grabbed some Authentique 6x6 pads and glued on some pretty papers, ran twine through the buttons, then hot glued them to the decorated magnets. Now my fridge doesn't look so dull!
Don't you just love my biscuit-colored 1990's fridge? Try not to be too jealous ; )

And lastly I made this little spinner card using one of the brads in the center:


Thanks for hopping along! Remember to leave a comment for a chance to win that $20 gift card to Scrapbook Steals!

Here's a reminder of the hopping order: